> Photoshop or any word processing program with fun fonts
> Printer with plain paper for creating letter stencils
> Card stock for creating garland letters (we chose a sparkly red sold in 12"x12" sheets)
> Pencil or pen
> Scissors
> Ribbon (any width/fabric - we chose a super thin double face satin)
> Permanent glue dots
> Large flat surface on which to work
STEP 1: Create Your Letter Stencils
Once you've chosen your phrase and font use your printer to individually print each letter you'll need. Our tallest letters are about 5" H and our widest letters are about 4" W to give you a gauge. Use your ruler tool in whatever program you use to help you keep your letter sizes consistent. Print the letters on plain printer paper then use your scissors to cut them out. Your end result should look something like this:
STEP 2: Create Your Card Stock Letters
Use the letter stencils you just created to trace and cut out your card stock letters for your garland. Use the back of your card stock to trace the letters. You'll want the pretty side of the card stock to be the face of your garland. Flip your letter stencils over before tracing so they're backwards on the card stock when you trace them. This way, they'll be facing the right direction once they're cut. Here's what this step looked like for us:
STEP 3: Cut Out Your Card Stock Letters
We chose a super scripty font for our letters so cutting them out, both for the stencils and garland letters, was time consuming. If you choose a block font it will be a much easier project! It's helpful to cut around each letter first so you can work with them individually and you're not having to hold the entire 12"x12" sheet of card stock while cutting. It's also easier to maneuver your scissors around the curves of each letter this way. Be careful not to cut through the thin areas of the letters or you'll have to redo them. We definitely had a couple to redo! After your letters are cut, lay them out in your phrase and make any necessary edits. We chose to trim the left side of our "l"s after seeing the completed letters all together.
STEP 4: Attach Your Letters To Ribbon
Now you want to cut a length of ribbon long enough to accommodate your phrase plus some generous extra on each end for hanging. Flip your card stock letters over and place a glue dot (or two or three whatever you find you need) at the top of each letter then press the ribbon to the letter. Check after each letter placement that your letters are hanging the way you'd like. Space your words evenly along the ribbon.
STEP 5: Hang Garland
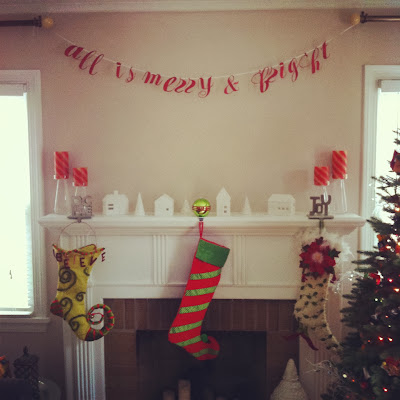
You're all done! Now all you have to do is find the perfect spot to hang your garland! We chose over the mantel and tied the garland ends to our curtain rods. Here's our final result:
From all of us here at Shi Shi to all of you - we wish you a holiday season that is merry & bright.
Joy & peace,
Gina Shi Shi


